Schedule Builder is a web-based schedule planner for use by students to generate all schedules available for registration. It helps you plan your class schedule and register for classes. Use this tool to build schedules prior to your enrollment appointment, taking into account both desired classes and personal needs (work, athletics, leisure, etc.). You can also find a class that fits into your schedule after you are enrolled.
Log on to SPIRE and click on Manage Classes on the Student Center.

Click Schedule Builder under Add, Drop, & Edit Classes. Schedule Builder will open in a new tab
Next you will be directed to Schedule Builder’s main page.

There are multiple filters available on this page. Below are the options for each filter


If you want to build in travel time between classes (keeping in mind standard class-meeting times have 15 minute breaks built into the schedule), click on the Advanced Options button and choose a different Class Padding.
You can now start adding desired courses and breaks to your schedule by clicking on Add Course or Add Break.

You can search for courses by subject, based on class attributes (Rap/Tap/HLC), by general education category, by instructor, or by class #.

When you are done with adding courses click on "Go Back to Generate Schedules".
You will be directed to Schedule Builder’s home page. Click on Generate Schedule to see all the possible schedules.

And see the generated schedules below

By hovering over the magnifying glass you can see a preview of each schedule.
You can select up to 4 schedules and compare them.
Click on View to look at the details of a potential schedule.

When you view/open a schedule, you can mark the schedule as your favorite by clicking on the heart icon and choosing a name for it.
![]()

You can look at your favorite schedules by clicking on favorites.

If you like a specific course section, you can lock it by clicking on the lock icon next to the course. This way the other courses will be scheduled around that locked course.


If you would like to exclude some sections, you can do it by clicking on Sections icon next to the course

and unchecking the sections that you want to be excluded then Save & Close.

If you are happy with a schedule, click on Send to Shopping Cart

You will be directed to a new set of pages to define the class settings. Click on "Next" through the set of screens and when you click on "Finish", the courses are in your shopping cart. There is a "Shopping Cart" tab on top of the page and you can review your shopping cart by clicking on the tab. You can edit the courses in your shopping cart by clicking on "Edit Cart".
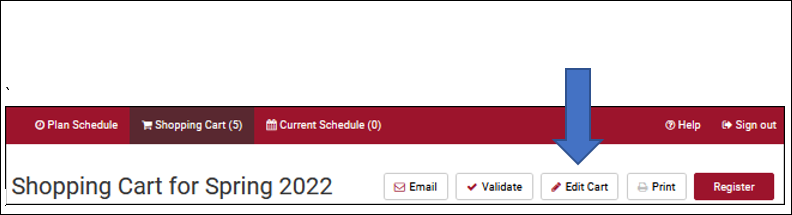
Before you register for the courses, you can click on "Validate" to make sure you meet all the requirements to enroll in the courses in your shopping cart. This button checks for prerequisite, time conflict, closed class, etc. Once you have the perfect cart, click on "Register" and after confirming the registration you are registered in these course without leaving the Schedule Builder.
You can also Edit or Drop classes in Schedule Builder by clicking on "Edit or Drop Classes". You also have the option to Swap classes from the "Current Schedule" page.

You can always go back to Schedule Builder by clicking on the schedule builder button to modify your schedule or build a new one.
If you have questions, please contact ursystems@registrar.umass.edu